Once an invoice has been created (as described in Creating a New Invoice), changes can be made to it at any time before sending it to the customer. If changes are required after the invoice has been sent, refer to Changing Sent Invoices below.
To change the commissioned employee, click the Edit
icon (![]() ). In the Assign employee popup, search for your
employee, and click the Add icon
(
). In the Assign employee popup, search for your
employee, and click the Add icon
(![]() )
beside the employee's name. In the confirmation popup, click the OK button.
)
beside the employee's name. In the confirmation popup, click the OK button.
To change the customer assigned to the invoice, click the
Edit icon (![]() ).
In the Assign customer popup, search for your customer, and click the
Add icon (
).
In the Assign customer popup, search for your customer, and click the
Add icon (![]() )
beside their name. If the customer is not yet registered in your database,
use the New customer for the new invoice
section at the top of the popup to add them (see step 4 in the instructions
above for more information). In the confirmation popup, click the
OK button.
)
beside their name. If the customer is not yet registered in your database,
use the New customer for the new invoice
section at the top of the popup to add them (see step 4 in the instructions
above for more information). In the confirmation popup, click the
OK button.
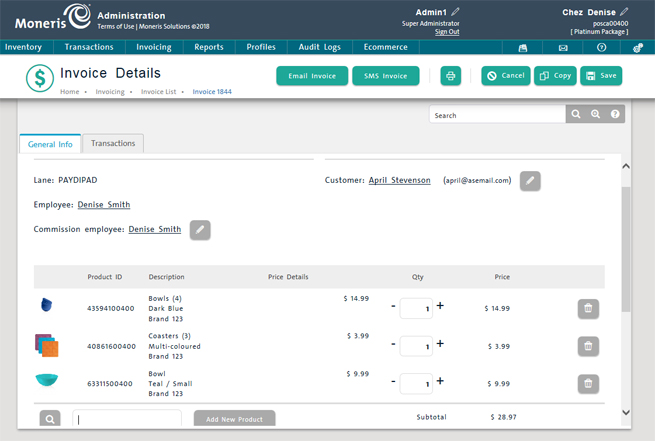
To change the item quantities, use the + or - icons beside the Qty field, or click inside the Qty field and manually key in a quantity.
If the wrong item has been added to the invoice, click
the Delete icon ( ) beside the item you wish
to remove. The item is removed from the invoice.
) beside the item you wish
to remove. The item is removed from the invoice.
To change any of the scheduling details (Delivery method, Shipping/Pickup Date, Balance Due Date, or Scheduled Invoice Date), click the Scheduling section heading and make the necessary changes.
To change any notes entered (or to enter a note), click the Notes section heading and make changes as necessary.
To print a copy of the invoice, click the Print
icon ( ) at the top of the screen. Use the Print dialog
box to select the printer, then click the Print
button.
) at the top of the screen. Use the Print dialog
box to select the printer, then click the Print
button.
Click the Save button at the top of the screen to save the invoice.
Once an invoice has been saved and sent to the customer, it may become necessary to edit the invoice to change something.
From the PAYD Administration main screen, click Invoicing.
On the Invoicing menu, click Invoice List.
The Invoicing screen appears with a list of all invoices.
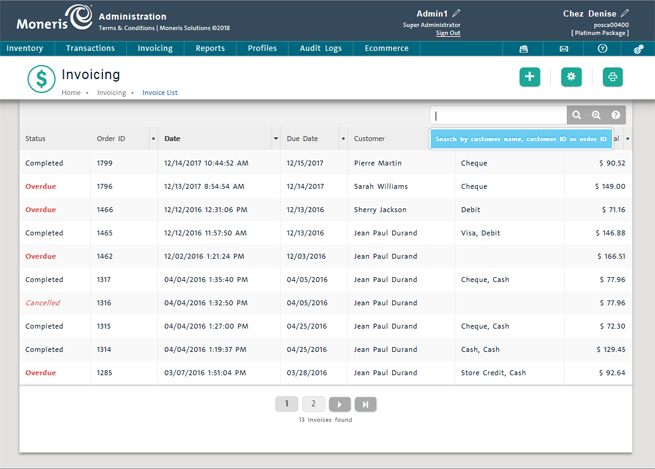
Search for the invoice you wish to change.
Change the following items:
● the commissioned employee
● the scheduling details
● the invoice notes
NOTE: If you wish to change the customer (recipient), products, prices, quantities, or promotions, it is advised to create a new duplicate invoice to resend to the customer.
In the Invoice Details screen, on the General Info tab, you can add a discount to the invoice.
To add a discount to the transaction:
Search for the invoice:
a. From the PAYD Administration main screen, click Invoicing.
b. On the Invoicing menu, click Invoice List.
c. On the Invoice List screen, search for the invoice by order ID, by customer name, or by customer ID.
2. Click on the invoice to view its details.
The Invoice Details screen appears.
Click the Add Discount button.
A popup appears.
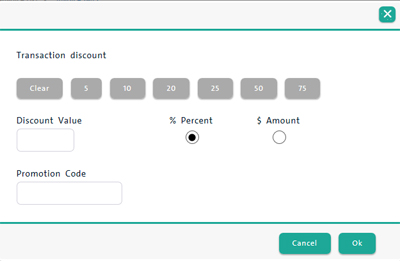
Select your discount options:
● To apply a predefined discount amount to the transaction:
Click one of the predefined values i.e. 5, 10, 15, etc., then click one of the options for whether that is a percent or a dollar amount. Proceed to step 5.
EXAMPLE: The customer requires a $25 discount off their invoice. Click the 25 button, then click the $ Amount option.
● To apply a user-defined discount amount to the transaction:
Click inside the Discount Value field and enter a number, then click one of the options for whether that is a percent or a dollar amount. Proceed to step 5.
EXAMPLE: The customer requires a 35% discount off their invoice. Enter 35 in the Discount Value field, then click the % Percent option.
● To use a discount code to the transaction:
Click inside the Promotion Code field and enter the promotion code. Proceed to step 5.
Click the OK button at the bottom of the popup.
The Invoice Details screen appears, and the discount is applied to the transaction, reducing the amount due.
Click the Save button at the top of the screen.
Resend the invoice to the customer.