To select a sub-set of your inventory for export, search the inventory for the desired items to export.
Click the Export button  at the top of the screen.
Use the export function in the Product Search Results screen to export your PAYD Pro PlusTM inventory as a Comma Separated Values (CSV) text file.
The data included in an export is based on the search results displayed in the Product Search Results screen at the time of executing the export. This allows you to export your entire inventory or a selected sub-set of your inventory by narrowing results through a simple search or an advanced search.
You can also create a template for your inventory export. Refer to the Creating Inventory Export Templates section below for more information.
To use a saved inventory export template, refer to the Exporting Inventory Using a Saved Template section below for more information.
If you need to make changes during the export, click the Back button at the bottom of the wizard screen. You can also cancel the export at any time by clicking the Cancel button.
On the PAYD Administration main screen, click Inventory.
On the Inventory menu, under the Product heading, click Product List.
The Product Search Results screen appears.
NOTE: To export your entire inventory, skip ahead to step 4.
To select a sub-set of your inventory for export, search the inventory for the desired items to export.
Click the Export button at the top of the screen.
The Export Wizard appears.

Click the Next button at the top of the screen.
The Fields Selection screen appears.
TIP: For information on creating an export template, refer to the Creating Inventory Export Templates section below.
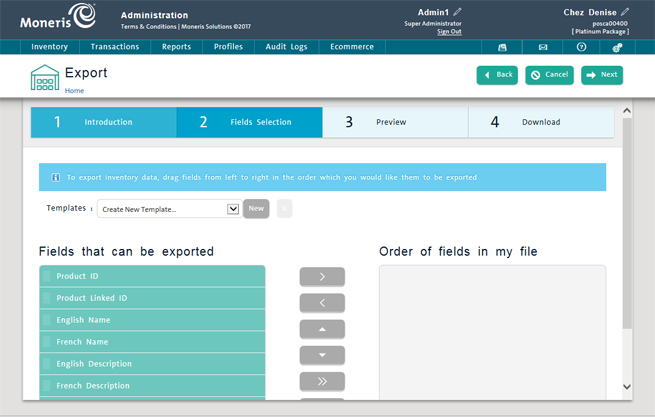
Click and drag fields from the Fields that can be exported box to the Order of fields in my file box. To remove a field from the Order of fields in my file box, click and drag it back to the Fields that can be exported box. To reorder the fields, click and drag them in the box as needed.
TIP: To select all the fields, click the Select All button.![]() To remove all the fields from the Order of fields in my file box, click the Remove All button.
To remove all the fields from the Order of fields in my file box, click the Remove All button.![]()
NOTE: For complete field descriptions, see Adding a New Product, Entering Additional Product Information and Editing the Default Product ID.
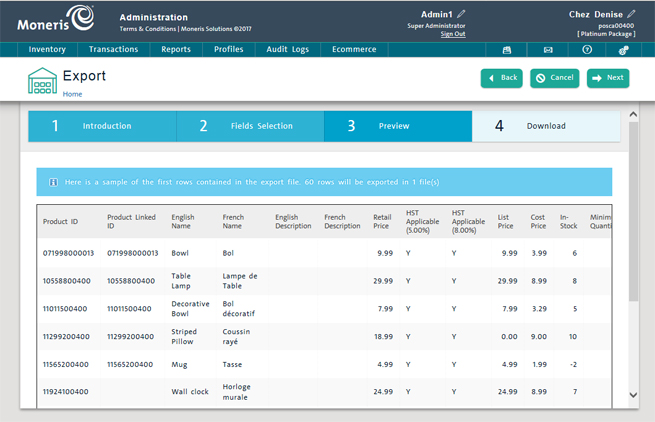
To preview the export data, click the Next button. If you need to make any changes, click the Back button.
The Preview screen appears.
Do one of the following:
If you are satisfied with the results of your selection, go to step 9 below.
If results are incorrect, click the Back button to make the necessary corrections, repeating steps 6 and 7 above.
Click the Next button to export the data.
The Download screen appears displaying the name of the export file.

NOTE: If you are exporting a large amount of data, PAYD Pro Plus may need to create more than one export file (maximum 10,000 rows per file). If this is the case, PAYD Pro Plus lists all the export files with a separate Download button for each one. You then must download the files one at a time.
Select the type of export file you'd like to create:
To export the inventory data file to an Excel spreadsheet, click the Excel button.
OR
To export the inventory data file to a comma separated text file, click the CSV button.
Do one of the following:
To open and view the file, click Open.
To save the file, click Save. In the Save As dialogue, select a location for the file, rename the file if necessary, and then click Save.
To close the dialogue and return to the Download screen, click Cancel.
To exit the wizard and return to the Product Search Results screen, click Done at the top of the Export screen.
NOTE: To view and work with the exported data in Microsoft Excel, you must start Excel and import the file through the data import function.
PAYD Pro Plus provides you with the ability to create an export template that you can re-use to export your inventory as often as you wish, without the need to perform the steps above each time you wish to export. The export template will save the fields that you drag over in the Fields Selection screen (performed in step 6 above).
On the PAYD Administration main screen, click Inventory.
On the Inventory menu, under the Product heading, click Product List.
The Product Search Results screen appears.
NOTE: To export your entire inventory, skip ahead to step 4.
To select a sub-set of your inventory for export, search the inventory for the desired items to export.
Click the Export button at the top of the screen.
The Inventory Export Wizard appears.
Click the Next button at the bottom of the screen to select the data fields you want to include in the export.
The Fields Selection screen appears.
Click and drag fields from the Fields that can be exported box to the Order of fields in my file box. To remove a field from the Order of fields in my file box, click and drag it back to the Fields that can be exported box. To reorder the fields, click and drag them in the box as needed.
TIP: To select all the fields, click the Select All button.![]() To remove all the fields from the Order of fields in my file box, click the Remove All button.
To remove all the fields from the Order of fields in my file box, click the Remove All button.![]()
NOTE: For complete field descriptions, see Adding a New Product, Entering Additional Product Information and Editing the Default Product ID.
Click the New button beside the Templates drop-down menu (above the Fields that can be exported and Order of fields in my file boxes).
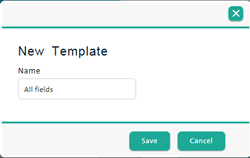
The New Template dialog box appears.
Enter a name for the template into the Name field and click Save.
To preview the export data, click the Next button. If you need to make any changes, click the Back button.
The Preview screen appears.
Do one of the following:
If you are satisfied with the results of your selection, go to step 11 below.
If results are incorrect, click the Back button to make the necessary corrections, repeating steps 6 - 9 above.
Click the Next button to export the data.
The Download screen appears displaying the name of the export file.
NOTE: If you are exporting a large amount of data, PAYD Pro Plus may need to create more than one export file (maximum 10,000 rows per file). If this is the case, PAYD Pro Plus lists all the export files with a separate Download button for each one. You then must download the files one at a time.
Select the type of export file you'd like to create:
To export the inventory data file to an Excel spreadsheet, click the Excel button.
OR
To export the inventory data file to a comma separated text file, click the CSV button.
Do one of the following:
To open and view the file, click Open.
To save the file, click Save. In the Save As dialogue, select a location for the file, rename the file if necessary, and then click Save.
To close the dialogue and return to the Download screen, click Cancel.
To exit the wizard and return to the Product Search Results screen, click Done at the top of the Export screen.
NOTE: To view and work with the exported data in Microsoft Excel, you must start Excel and import the file through the data import function.
Once an export template has been created and saved, it can be re-used subsequent times to export the same fields. As inventory information is updated through sales and purchase orders, you can access that information quickly using the saved template. Follow the steps below to access a saved inventory export template.
On the PAYD Administration main screen, click Inventory.
On the Inventory menu, under the Product heading, click Product List.
The Product Search Results screen appears.
NOTE: To export your entire inventory, skip ahead to step 4.
To select a sub-set of your inventory for export, search the inventory for the desired items to export.
Click the Export button ![]() at the top of the screen.
at the top of the screen.
The Inventory Export Wizard appears.
Click the Next button at the bottom of the screen to select the data fields you want to include in the export.
The Fields Selection screen appears.
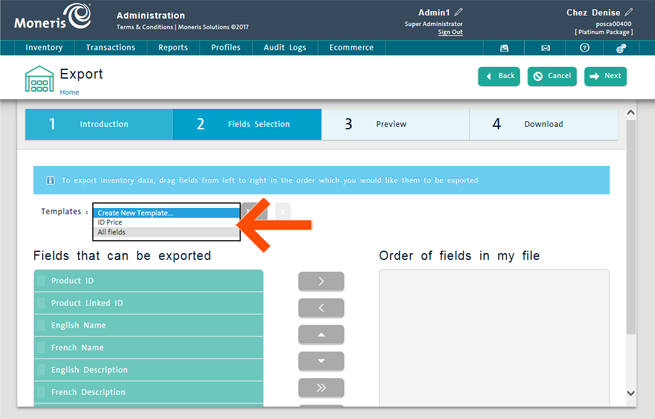
In the Fields Selection screen, click the Templates drop-down menu and select a saved template from the list.
The Order of fields in my file box populates with the saved fields.
NOTE: You can choose to add or remove fields from your template if you wish. Click and drag fields from the Fields that can be exported box to the Order of fields in my file box. To remove a field from the Order of fields in my file box, click and drag it back to the Fields that can be exported box. To reorder the fields, click and drag them in the box as needed. Once the fields have been adjusted, click the Save button beside the Templates drop-down menu.
To preview the export data, click the Next button. If you need to make any changes, click the Back button.
The Preview screen appears.
Do one of the following:
If you are satisfied with the results of your selection, go to step 9 below.
If results are incorrect, click the Back button to make the necessary corrections, repeating steps 6 and 7 above.
Click the Next button to export the data.
The Download screen appears displaying the name of the export file.
NOTE: If you are exporting a large amount of data, PAYD Pro Plus may need to create more than one export file (maximum 10,000 rows per file). If this is the case, PAYD Pro Plus lists all the export files with a separate Download button for each one. You then must download the files one at a time.
Select the type of export file you'd like to create:
To export the inventory data file to an Excel spreadsheet, click the Excel button.
OR
To export the inventory data file to a comma separated text file, click the CSV button.
Do one of the following:
To open and view the file, click Open.
To save the file, click Save. In the Save As dialogue, select a location for the file, rename the file if necessary, and then click Save.
To close the dialogue and return to the Download screen, click Cancel.
To exit the wizard and return to the Product Search Results screen, click Done at the top of the Export screen.
NOTE: To view and work with the exported data in Microsoft Excel, you must start Excel and import the file through the data import function.