To unassign a customer from the pricing group, click the Remove icon (![]() ) beside the customer in the list.
) beside the customer in the list.
Use the Search textbox to find customers using the following guidelines. Entering no criteria will list all the customers in PAYD Pro Plus.
Use the Pricing Groups screen to edit pricing groups set up in PAYD Administration. Any changes you make to a pricing group immediately affect the customers and the products the pricing group is assigned to.
You can assign pricing groups to customers and products in PAYD Administration using the Pricing Groups screen. You can also assign customers to pricing groups using the Customer Search Results screen (for help, see Editing Customer Details ). And you can assign pricing groups to products using the Product Details screen (for help, see Entering Additional Product Information ).
On the PAYD Administration main screen, click Inventory.
On the Inventory menu, under the Pricing section, click Pricing Groups.
The screen displays a list of pricing groups set up on your PAYD Pro Plus system.
On the list, click the Pricing Group Name / Description.
The Pricing Groups screen appears with the General Information tab selected.
Make the necessary changes following the guidelines below:
o Name - Each pricing group is required to have an English name. A French name is optional.
o Description - Both English and French descriptions are optional.
o Apply - The percent discount that you want applied to the retail prices of the products the pricing group is assigned to (required).
o Available In - Change the sales channels in which this pricing group is available.
NOTE: This setting is only available if you are using the PAYD Pro Plus eCommerce module.
Click the Save button on the top of the screen.
NOTE: You can also assign customers to pricing groups through the Customer Search Results screen. For more help, see Editing Customer Details.
Click the Customers tab.
The tab displays the list of customers assigned to the pricing group.
To unassign a customer from the pricing group, click the Remove icon (![]() ) beside the customer in the list.
) beside the customer in the list.
Use the Search textbox to find customers using the following guidelines. Entering no criteria will list all the customers in PAYD Pro Plus.
o Customer name - Partial first or last name (minimum 2 characters).
o Customer ID - The ID used by PAYD Pro Plus to identify the customer (exact match).
o Customer email - The customer's email address (exact match).
o Customer phone - The customer's phone number (minimum 3 digits).
o Status - The customer's status: Active or Inactive (exact match).
Click the Search icon. ![]()
A list of matching customers appears.
HINT: To search for all customers, leave the Search textbox blank and click the Search icon ![]() .
.
Assign customers to the pricing group by clicking the Add icon (![]() ) beside the customers in the list.
) beside the customers in the list.
Each assigned customer appears in a list at the top of the tab.
Click the Categories tab.
The tab displays the list of categories assigned to the pricing group.
To unassign a category from the pricing group, click the Remove icon (![]() ) beside the category in the list.
) beside the category in the list.
Click the Add button on the top of the screen.
An Assign Category popup appears.
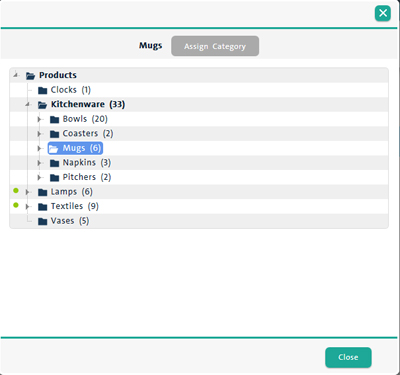
In the category hierarchy tree, find the category you want to assign to the pricing group. Use the triangular icons (![]() ) to expand and collapse the tree.
) to expand and collapse the tree.
Click the category in the tree to select it.
An Assign Category button appears at the top of the popup.
Click the Assign Category button.
The assigned category appears in a list at the top of the tab.
To assign additional categories, repeat the steps above as required.
NOTE: You can also assign pricing groups to products through the Product Details view. For more help, see Entering Additional Product Information.
Click the Products tab.
The tab displays the list of products assigned to the pricing group.
To unassign a product from the pricing group, click the Remove icon (![]() ) beside the product in the list.
) beside the product in the list.
Use the Search textbox to find products by entering the Product Name (minimum 2 characters) or Product ID (exact match). Entering no criteria will list all the products in the PAYD Pro Plus inventory.
Click the Search icon (![]() ).
).
A list of matching products appears.
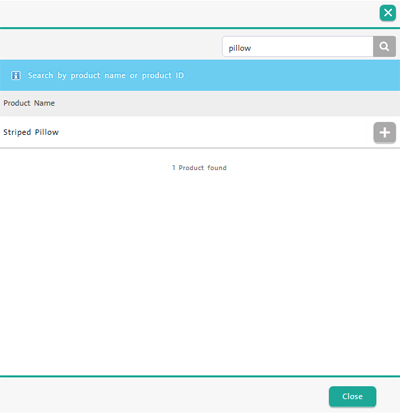
Assign products to the pricing group by clicking the Add icon (![]() ) beside the products in the list.
) beside the products in the list.
NOTE: When you assign a product to a pricing group, all of its Product IDs are automatically assigned as well.
To assign additional products, repeat the steps above as required.