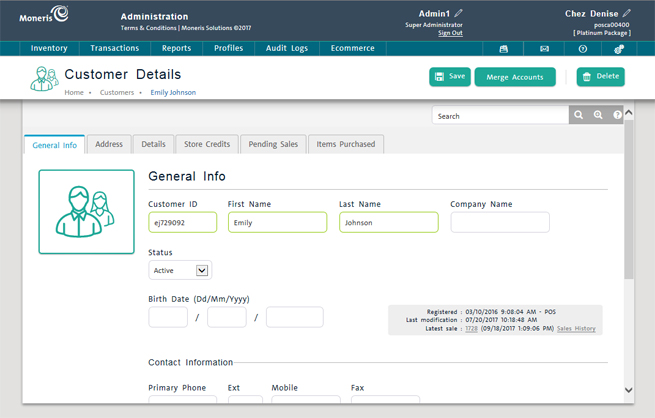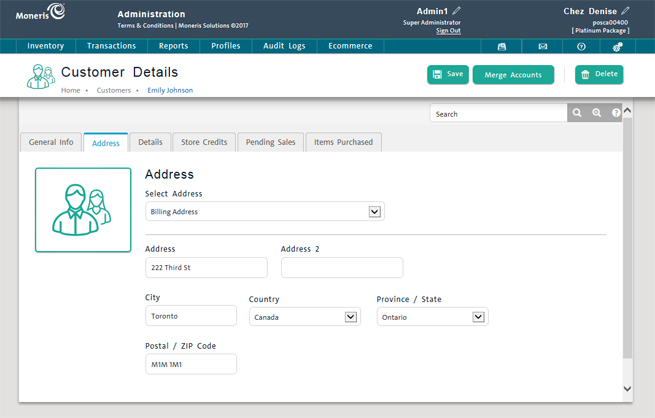
Use the Customer Search Results screen to edit a customer's details. Start by finding the customer's record. You can then edit the customer's general information, billing address and customer options.
NOTE: You can also edit customer details through a customer import (see Importing Customer Data).
On the PAYD Administration main screen, click Profiles.
On the Profiles menu, under the Customers section, click Search.
A list of customers appears sorted in descending order by Registration Date.
On the Customer Search Results screen, find the customer record by:
Browsing the customer list i.e. scrolling up and down and navigating the pages.
OR
Searching for the customer (see Searching Customers).
On the customer list, click the Customer ID.
The record appears in the Customer Details screen with the General Information tab selected.

On the General Info tab, edit the fields as necessary, using the guidelines below:
Under the General Info section, the following details may be edited:
Customer ID - The ID used by PAYD Pro PlusTM to identify the customer.
First Name - The customer's first name (required).
Last Name - The customer's last name (required).
Status - The customer's status: Active or Inactive.
NOTE: Inactive customers cannot be assigned to a sale.
Birth Date -The customer's birthday in DD/MM/YYYY format.
Under the Contact Information section, the following details may be edited:
Primary Phone - The customer's primary phone number, including area code (required). You do not need to enter dashes. If applicable, enter an extension in Ext.
Mobile - The customer's mobile phone number, including area code (required). You do not need to enter dashes.
Fax - The customer's fax number.
Under the Email section, the following details may be edited:
Email - The customer's email address (optional). This email address can also be used by the customer to receive mass marketing emails from your business.
NOTE: If your store is configured to email receipts to customers at the time of sale, the receipt is emailed to this address.
Part Of Mailing List - Choose the Yes option to make this customer part of a mass mailing list. Select No to opt the customer out of receiving mailing from your business.
Reset Password - The password being referenced here is the customer's password used for login to the PAYD Pro Plus eCommerce website. The customer created the password when they registered to use your PAYD Pro Plus eCommerce website. Click this button to reset the password. See Resetting eCommerce Passwords for more information.
Login History - The history being referenced here is the customer's logins to the eCommerce website. Once the customer is registered as an eCommerce user, the system tracks when they login to their account, and the IP address that was used at the time.
NOTE: These buttons are only visible to merchants using the PAYD Pro Plus eCommerce module.
Click the Save button at the top of their profile.
Click the Address tab.

Edit the fields as necessary, using the guidelines below:
Address - Customer's billing street address.
City - Customer's billing address city.
Country - Customer's billing address country selected from the drop-down list.
Province/State - Customer's billing address state or province selected from the drop-down list. Options are populated based on Country.
Postal/ZIP code - Customer's billing address postal or zip code.
Click the Save button at the top of their profile.
Click the Details tab.

To assign or re-assign the customer to a pricing group, select the group from the Pricing Group drop-down list.
NOTE: The customer is able to receive any discounts or perks associated with the Pricing Group when they login to the eCommerce website with a user name/password that is associated with their PAYD Pro Plus customer profile.
From the Language Of Correspondence drop-down list, select English or French as appropriate. The default is English.
If the customer has tax exemption status, complete the tax exemption fields as follows:
Tax Exemptions - Place checkmarks in the Tax Exemptions checkboxes to exempt this customer from paying the checked tax on transactions. If the customer does not have tax exempt status, leave these boxes unchecked.
Tax Exemption Registration - Enter the tax exemption registration number/ID on the tax exemption identity card provided by the customer (for customers entitled to a tax exemption) into this field.
Band Number - Enter the band or registry number on the Certificate of Indian Status identity card provided by the customer (for customers entitled to a tax exemption) into this field.
In the Notes textbox, add or edit any notes you want to store about the customer.
Click the Save button at the top of their profile.
Assigning a Customer to a Sale
Merging Duplicate Client Profiles
Editing Customer Details (Mobile)