The Sales by Employee Report lists sales transacted during the specified time period and summarizes the sales by employee. Results are sorted in descending order by date and time. See below to run the report and view report results. You can also export the report and print it.
On the PAYD Administration main screen, click Reports.
On the Reports menu, click Employees, then click Sales by Employee.
The Sales by Employee report screen appears.
Specify the time period by entering a Month, Day and Year in the Starting date and Ending date textboxes.
NOTE: The default time period is Today.
Click the View button.
Results appear below.
Click the Show Options button on the top of the screen.
Click the Lanes button.
On the Select Lane(s) popup, select the checkboxes for the lanes you want to include in the report and then click OK (all lanes are selected by default).
Click the View button.
Click the Stores button.
On the Select Store(s) popup, select the checkboxes for the stores you want to include in the report and then click OK (all your stores are selected by default).
Click the View button.
Click the Start of day drop-down menu and select a starting time for the report results.
Click the End of day drop-down menu and select an end time for the report results.
Click the View button.
NOTE: The default setting for this report is the entire day (within the date range selected). To run the report for the entire day, leave the defaults set to Start of day and End of day. It is also possible to see results for specific times of the day. For example, if you wanted to see results between 9am and noon, you would enter a start time of 09:00 and an end time of 12:00. Then if you wanted to see results from 2pm to 5pm you would repeat steps 1-3 selecting a start time of 14:00 and an end time of 17:00. The time frame works on a 24-hour clock.
Click the Show Options button on the top of the screen.
Click the Employees button.
On the Select Employee(s) popup, select the checkboxes for the employees you want to include in the report and then click OK (all employees are selected by default).
Click the View button.
Click the Show Options button on the top of the screen.
In the Include Refunds section, click the Yes radio button.
Click the Period drop-down menu and select the appropriate time period from the list e.g. Last Month.
Click the Print button above the results.
Refer to Printing Reports for more information.
Refer to Exporting Reports for more information.
The Sales Summary displays the following for matching results:
Employee ID - ID used by PAYD Pro PlusTM to identify the employee who transacted the sales (click to view details) .
Number of Sales - Number of sales by the employee during the specified time period.
Total - Total $ amount of the sales by the employee.
The report lists matching sales as follows, sorted in descending order by Date:
Date - Date and time of the sale (default sort).
Order ID - PAYD Pro Plus ID for the sale (click to view details).
Total - Total $ amount of the sale.
Payment Method - Sale payment method: Cash, Debit, Visa, MasterCard, American Express, Gift Card, Cheque, Store Credit, Other.
Customer ID - ID used by PAYD Pro Plus to identify the customer who transacted the sale (click to view details).
Employee ID - ID used by PAYD Pro Plus to identify the employee who transacted the sale (click to view details).
Lane - POS lane in which the sale occurred.
Click the heading of the column you want to sort on (highlighted on mouseover).
Click again on a heading to toggle between descending and ascending order.
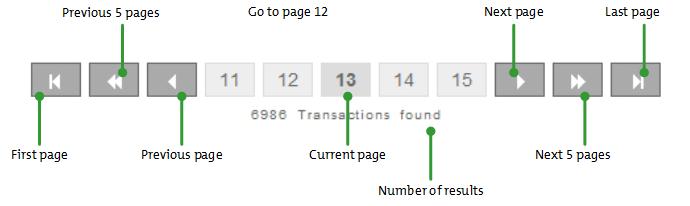
Use the navigation bar below the report results. The current page is highlighted.