Tap the Add New Customer button ( ) at the top of the right pane.
You can use the Customers screen to add, edit and remove customers from the database.
NOTE: Based on your PAYD account type, you may encounter a limit to the number of customer profiles that can be added to the customer database. Once the limit is reached, you will not be able to save additional customer profiles unless previously created profiles are removed from the database to create space for new ones. For more information on increasing this limit, please call us at 1-855-423-PAYD (7293) to upgrade today.
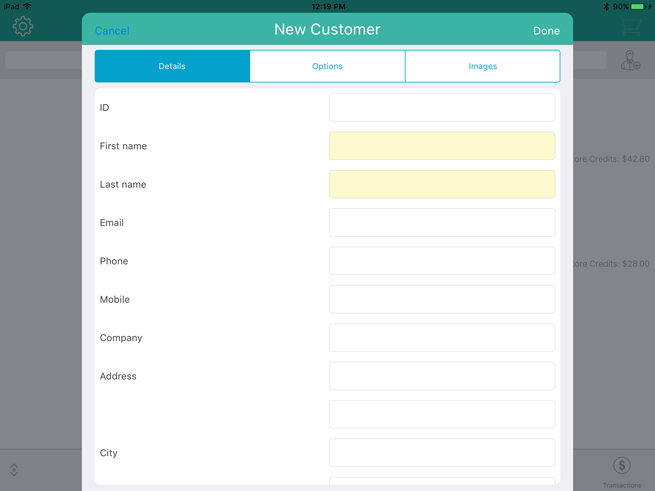
NOTE: Fields highlighted in yellow are mandatory.
At the bottom of the Sale screen, tap Customers.
The Customer Search screen appears.
Tap the Add New Customer button ( ) at the top of the right pane.
The New Customer popup appears.

In the Details tab of the New Customer popup, fill out the fields following the guidelines below:
ID - Leave this field blank for now. When the customer profile is saved, PAYD Pro Plus will automatically generate an ID for this customer.
First/Last name – Enter the customer’s first and last name into these fields.
Email – Enter the customer’s email address into this field.
NOTE: This is necessary if you will be emailing transaction receipts to your customers. The Email a receipt copy setting below needs to be enabled as well.
Phone – Enter the customer’s primary contact phone number into this field.
NOTE: Dashes or spaces are not necessary.
NOTE: Either a phone number OR an email address are required. The system will accept one or the other, or both.
Mobile – Enter the customer’s secondary contact phone number into this field if available.
NOTE: Dashes or spaces are not necessary.
NOTE: This is necessary if you will be sending transaction receipts to your customers via SMS text. See Texting Receipts for more information.
Company – Enter the customer’s business name into this field.
Address – Enter the customer’s primary street address into this field.
Address 2 – Enter the customer’s unit number (if applicable) into this field.
City – Enter the customer’s city into this field.
Postal Code – Enter the customer’s postal code into this field.
Country – Tap the drop-down arrow and select the customer’s country. By default, the merchant’s country will be selected.
Province – Tap the drop-down arrow and select the customer’s province. By default, the merchant’s province will be selected.
Birthday - Tap the first None and use the date selector to select the birth day, then tap Done when finished. Tap the second None and use the date selector to select the month, then tap Done when finished.
Tap the Options tab at the top of the New Customer popup.
Fill out the customer options as follows:
Language – Tap Select, and use the language selector to choose the customer’s preferred language of correspondence, then tap Done. By default, the merchant’s default language will be selected.
Pricing group – Tap None, and use the pricing group selector to choose the pricing group to which this client belongs (if applicable), then tap Done. By default, the customer does not belong to a pricing group until assigned.
Email a receipt copy – Toggle this switch to the right (Enabled) to allow this client to receive emailed copies of their transaction receipts.
NOTE: You must enter an email address in the Email field above.
Part of mailing list – Toggle this switch to the right (Enabled) to allow this client to receive promotional emails from your business.
NOTE: This feature may or may not be visible based on your Merchant Agreement with Moneris®.
Taxes - Tap the tax that this client is required to pay for purchases. By default the customer will be paying all taxes. If the client has tax exempt status, tap None.
Tax exemption registration - If this client is eligible for tax exemptions in your jurisdiction, enter their registration number in this field. If this customer does not have tax-exempt status, leave this field blank.
Band number - If this customer has a native status card, enter their band number from the card into this field. If this customer does not have a native status card, leave this field blank.
(Optional) Tap the Images tab at the top of the New Customer popup. If you do not want to include a customer picture, proceed to step 8.
Add a picture of the customer following the steps below:
Tap Select in the middle of the Images tab.
A popup appears.
b. Select the method by which you would like to add an image to the customer profile:
● To use an image that is already stored on the Apple iPad's internal memory:
Tap Library.
Browse the images stored on the Apple iPad, and tap the image once you locate it. Proceed to step 8.
● To take a picture of the customer:
Tap Camera.
Take the photo.
Tap Use Photo to use the image. Proceed to step 8.
OR
Tap Retake to retake the image. Repeat step ii.
Tap Done in the top right corner of the New Customer popup.
Repeat steps 1 - 8 to add other customers as necessary.
Deleting Customers in the Mobile App
Registering a New Customer (In-Store)