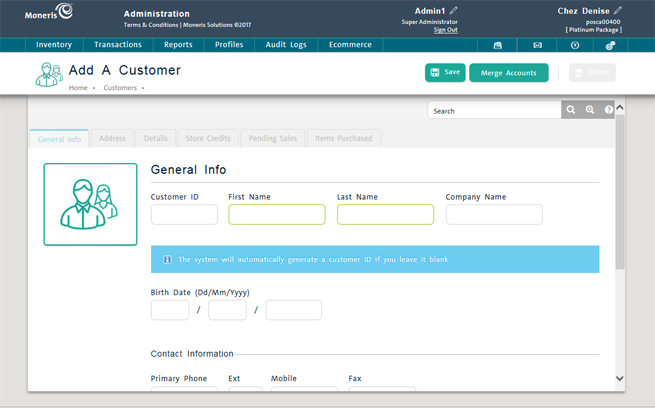
Register a new customer in your customer database through the Customer Search Results screen. Start by creating the new customer's record and entering basic customer information. After you save the new record, you can enter optional customer information.
NOTE: You can also add new customers to your customer database through a customer import (see Importing Customer Data).
NOTE: Based on your PAYD account type, you may encounter a limit to the number of customer profiles that can be added to the customer database. Once the limit is reached, you will not be able to save additional customer profiles unless previously created profiles are removed from the database to create space for new ones. For more information on increasing this limit, please visit us at getpayd.com/paydproplus or call us at 1-855-423-PAYD (7293) to upgrade today.
On the PAYD Administration main screen, click Profiles.
On the Profiles menu, under the Customers section, click Add a Customer.
OR
On the Profiles menu, under the Customers section, click Search. At the top of the Customer Search Results screen, click Register Customer.
A blank Add a Customer screen appears with the General Info tab selected.

NOTE: The Details tab is disabled until you save the new record.
Complete the fields as follows (required fields are highlighted yellow):
Under the General Info section, the following information can be entered:
Customer ID - Enter a unique alphanumeric ID that PAYD Pro PlusTM will use to identify the customer (optional).
TIP: PAYD Pro Plus automatically generates a customer ID if you leave the field blank.
First Name - Enter the customer's first name (required).
Last Name - Enter the customer's last name (required).
Company Name - Enter the name of the company or the place of employment for the customer.
Birth Date - Enter the customer's birthday in DD/MM/YYYY format into these fields.
Under the Contact Information section, the following information can be entered:
Primary phone - Enter the customer's primary phone number, including area code (required). You do not need to enter dashes. If applicable, enter an extension in Ext.
Mobile - The customer's mobile phone number.
Fax - The customer's fax number.
Under the Email section, the following details are displayed:
Email: The customer's email address, if one is provided. This email address can also be used by the customer to receive mass marketing emails from your business.
Uses ECommerce - This label appears if your business uses the PAYD Pro Plus eCommerce module. By default it displays "No" until a customer actually registers at your eCommerce website. The Reset Password and Login History buttons are also part of the customer's eCommerce profile. For more information, see Resetting eCommerce Passwords and Viewing eCommerce Login History respectively. For now, because you are registering a new customer, there will be no password to reset nor login history to view.
Part of Mailing List - If the customer will be part of your mass emailing list, click the Yes radio button, otherwise click No.
Email Receipt - If this customer would like to receive their receipts via email, click the Yes option.
NOTE: This requires a valid email address to be entered in the Email field above.
Click the Save button at the top of the screen.
The new customer record appears in the Customer Search Results screen.
NOTE: For help on other information displayed in the view, see Viewing Customer Details.
Merging Duplicate Client Profiles
Creating Customer Profiles (Mobile)