Search for the sale quote by its Quote ID, creation date (in YYYY/MM/DD format), the name, phone number or email address of the customer to whom the quote belongs.
Click on the quote in the list.
When the Sales Quotes feature is enabled in the Configuration - Settings screen, you can generate a Sales Quote from the POS view. There are several tools to manage Sales Quotes:
Creation of Sales Quotes
Viewing Sales Quotes
Modification of Sales Quotes
Billing for Sale Quotes
Cancellation of Sales Quotes
Print Receipts
It is possible to create a sales quote for a registered customer.
In the POS view, assign a customer to the sale. If the customer is not in your database, create a new profile for them.
Add the item(s) to the bill as needed.
Assign any applicable discounts as needed.
Click the Sale Quote button on the right side of the screen.
A Sale Quote confirmation popup appears.
Click the Yes button to create the quote.
The system creates the quote and returns to the POS view. The screen is reset (meaning that the customer and items you had added for the quote are removed from the screen) and a receipt prints.
Once a quote has been created, it can be viewed at any time. Follow the instructions below to view existing quotes.
In the POS view, click the Sale Quote button on the right side of the screen.
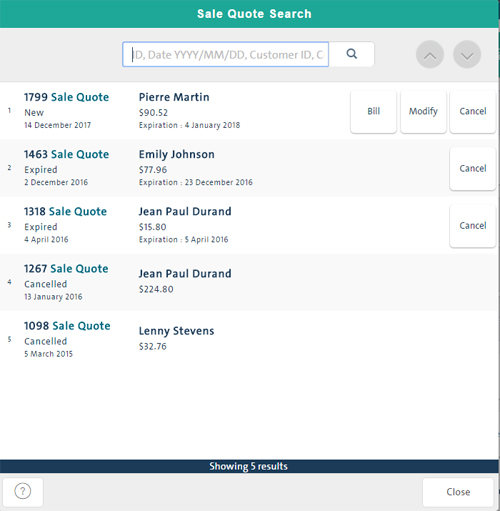
The Sale Quote Search popup appears.
Search for the sale quote by its Quote ID, creation date (in YYYY/MM/DD format), the name, phone number or email address of the customer to whom the quote belongs.
Click on the quote in the list.
A details popup appears.
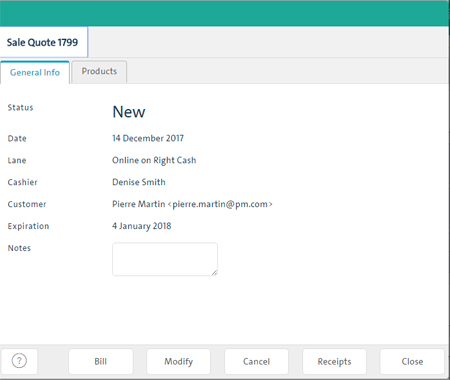
From the details popup, do one of the following:
Collect payment for the items on the quote. See Billing Sales Quotes below.
Modify the quote. See Modifying Sales Quotes below.
Cancel the quote. See Cancelling Sales Quotes below.
Print a receipt of the quote. See Printing Quote Receipts below.
Close the quote details by clicking the Close button.
In the POS view, click the Sale Quote button on the right side of the screen.
The Sale Quote Search popup appears.
Search for the sale quote by its Quote ID, creation date (in YYYY/MM/DD format), the name, phone number or email address of the customer to whom the quote belongs.
Click on the quote in the list.
A details popup appears.
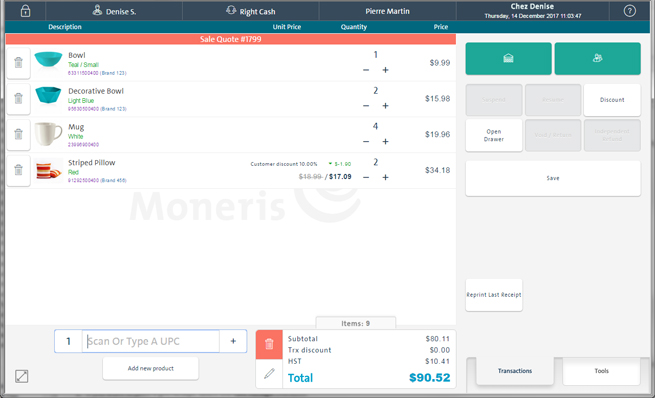
Click the Products tab and review it with the customer to ensure that the quote is acceptable. If the quote is acceptable, proceed to step 5. If the quote requires changes, see Modifying Sales Quotes below.
Click the Bill button at the bottom of the details popup.
The General Information popup appears.
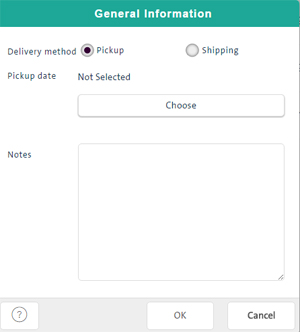
Select the method by which the customer will be taking possession of their quoted items:
● If the customer is picking up their merchandise in store;
a. Click the Pickup radio button.
b. Click the Choose button.
The calendar popup appears.
c. Click on the desired pick up date in the calendar. The calendar closes once the date is selected.
d. If applicable, enter notes about the pickup into the Notes field.
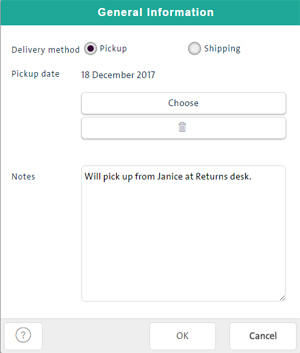
e. Click the OK button in the bottom of the popup.
f. Proceed to step 7.
● If you are shipping the products to the customer:
a. Click the Shipping radio button.
b. To set the shipping date, click the Choose button.
The calendar popup appears.
c. Click on the desired shipping date in the calendar. The calendar closes once the date is selected.
d. If applicable, enter notes about the shipment into the Notes field i.e. the tracking number.
e. Click the OK button in the bottom of the popup.
NOTE: You may be prompted to complete the customer's shipping address info. In the Customer Details popup, enter the required information and click the Save button.
f. Proceed to step 7.
If prompted to select a staff for commission, click on the staff member's name in the Employee search popup.
The Invoice Deposit popup appears.
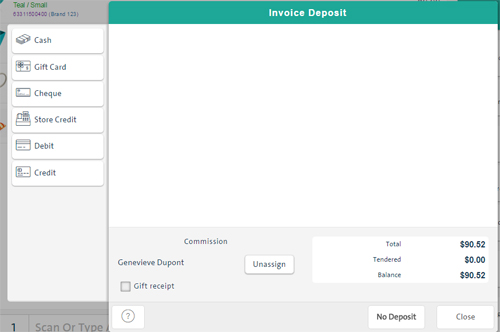
Click the payment type on the left side of the popup.
Process the payment as you would on a regular sale. For details, see Processing a Cash Payment, Processing a Gift Card Payment, Processing a Cheque Payment, Processing a Store Credit Payment, Processing a Debit Payment and Processing a Credit Card Payment.
The sale quote is complete and a blank POS view appears.
There are two ways in which you can access a quote to modify: from the Sale Quote Search screen, and from the quote details screen. See Viewing Sales Quotes above for more information. Once the quote has been located, click the Modify button. The quote launches in the POS view. The header indicates the quote ID you are modifying.
There are several changes you can make to a quote once it has been created, including:
You can change the customer to whom the quote was assigned,
the inventory items on the quote (add or remove),
the prices and/or quantities of items on the quote,
any applicable discounts (add or remove).
When you are finished modifying, click the Save button. The quote saves your changes and returns to the blank POS view.
Before a quote is approved, it can be cancelled. Quotes can be cancelled from the Sale Quote Search screen, or from within the quote details screen.
In the POS view, click the Sale Quote button on the right side of the screen.
The Sale Quote Search popup appears.
Search for the sale quote by its Quote ID, creation date (in YYYY/MM/DD format), the name, phone number or email address of the customer to whom the quote belongs.
Click the Cancel button beside the quote you wish to cancel.
The screen refreshes and the buttons disappear for that particular quote.
Click the Close button at the bottom of the Sale Quote Search screen.
In the POS view, click the Sale Quote button on the right side of the screen.
The Sale Quote Search popup appears.
Search for the sale quote by its Quote ID, creation date (in YYYY/MM/DD format), the name, phone number or email address of the customer to whom the quote belongs.
Click on the quote in the list.
A details popup appears.
Click the Receipts button.
The Receipts popup appears.
Choose one of the following receipt outputs:
To print a customer copy of the receipt, click Print Customer copy. The receipt prints and returns to the quote details screen.
To print a merchant copy of the receipt, click Print Merchant copy. The receipt prints and returns to the quote details screen.
To email the receipt to the customer, click Email Customer copy. An Email Receipt popup appears. Ensure the customer's email address is accurate (if necessary, click inside the field and change it), then click the OK button to send the message with the receipt. Click the OK button to return to the quote details screen.
Click the Close button at the bottom of the quote details screen to return to the Sale Quote Search screen.
Click the Close button at the bottom of the Sale Quote Search screen to return to the POS view.