The Transactions Button Panel appears along the right side of the POS view. It can have five possible configurations based on selected options:
Default configuration
Checkout configuration
Payout configuration
Sales Quotes configuration
Layaways and Invoices configuration

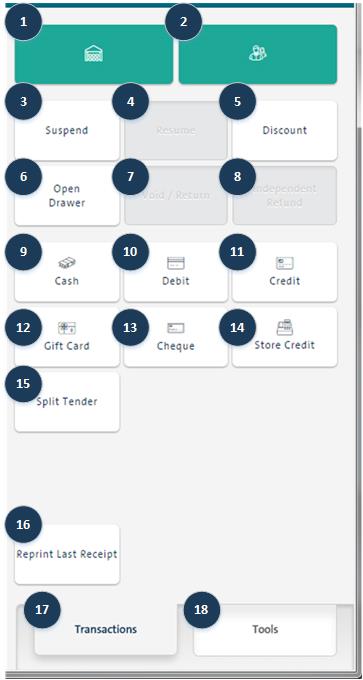
This configuration represents the default set of buttons that appear if no options are configured.

Label |
Description |
|
1 |
Products - Opens the Inventory Search screen. |
|
2 |
Customers - Opens the Customer Search screen. |
|
3 |
Suspend - Suspends the current transaction. Currently enabled because there is a transaction in progress. You can suspend a transaction in progress. When there is no transaction in progress, this button appears greyed out. |
|
4 |
Resume - Resumes a transaction. Currently appears greyed out because a transaction is currently in progress. When a transaction is not in progress, it becomes enabled so that you can resume a suspended transaction. |
|
5 |
Discount - Opens the Transaction Discount popup. |
|
6 |
Open Drawer - Opens the cash drawer. Currently appears greyed out because a transaction is currently in progress. When a transaction is not in progress, it becomes enabled so that you can open the cash drawer. |
|
7 |
Void / Return - Performs a void or return. Currently appears greyed out because a transaction is currently in progress. When a transaction is not in progress, it becomes enabled so that you can void or return a previously completed transaction. |
|
8 |
Independent Refund - Performs an independent refund. Currently appears greyed out because a transaction is currently in progress. When a transaction is not in progress, it becomes enabled so that you can perform an independent refund. |
|
9 |
Cash - Processes a cash payment. |
|
10 |
Debit - Processes a debit payment. |
|
11 |
Credit - Processes a credit card payment. |
|
12 |
Gift Card - Processes a gift card payment. |
|
13 |
Cheque - Processes a cheque payment. |
|
14 |
Store Credit - Processes a store credit payment. |
|
15 |
Split Tender - Processes a split tender payment. |
|
16 |
Reprint Last Receipt - Reprints the last transaction receipt. |
|
17 |
Transactions - The current button panel being viewed. |
|
18 |
Tools - Switches to the Tools button panel. |
This configuration represents the set of buttons that appear if the Use 'Checkout' button setting has been set to Yes in the Lanes screen. Most of the buttons are the same as the Default configuration; the only difference being the Checkout button which temporarily takes the place of the payment type buttons until clicked.

Label |
Description |
|
1 |
Checkout - While selecting a customer and selecting products to add to the transaction, the Checkout button appears on the Transactions button panel. On clicking the Checkout button, the customer can see the taxes and total on the display device. Refer to Using the Checkout Button for more information. |
This configuration represents the set of buttons that appear if the Quick payout button name has been selected in the Payout reasons section of the Configuration - Settings screen. Most of the buttons are the same as the Default configuration; the only difference being the addition of the Quick Payout button which appears to handle quick payouts. For the purposes of this example, the Quick Payout button was named Petty Cash, but you can give it any name you wish.

Label |
Description |
|
1 |
Quick Payout - When the Quick Payout button is clicked, it launches the Quick Payout function. Quick Payout can be used to account for cash coming out of the till for one specific reason. For more information, refer to the Using the Quick Payout topic. In the example shown here, the button was called "Petty cash" in the Configuration - Settings screen. NOTE: The button currently appears enabled because there is no transaction in progress. When a transaction is in progress, the button appears greyed out. |
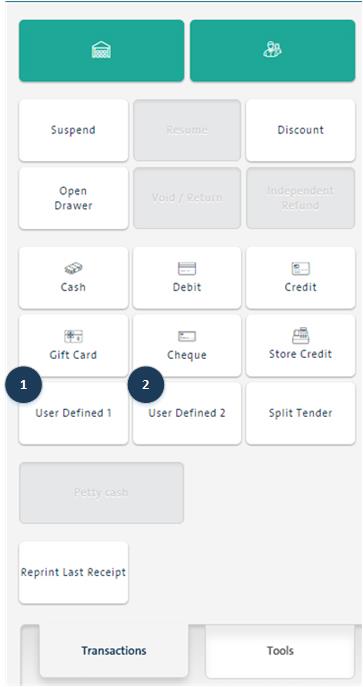
This configuration represents the set of buttons that appear if you have defined your own payment methods in the Payment types section of the Configuration - Settings screen. Most of the buttons are the same as the Default configuration; the only difference being the addition of the user defined payment type buttons, which appear to offer the merchant additional payment options. For the purposes of this example, the payment types were named User Defined 1 & 2, but you can give them any name you wish.

Label |
Description |
|
1 |
User Defined 1 - This button appears with whatever name (caption) is provided in the Configuration - Settings screen. Use this to handle transactions with a payment type other than the default payment types configured in the system. |
|
2 |
User Defined 2 - This button appears with whatever name (caption) is provided in the Configuration - Settings screen. Use this to handle transactions with a payment type other than the default payment types configured in the system. |
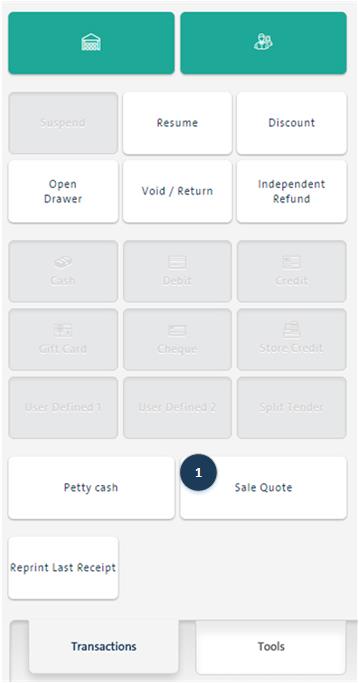
This configuration represents the button that appears if the Use Sales Quotes setting is set to Yes in the Configuration - Settings screen. Most of the buttons are the same as the Default configuration; the only difference being the addition of the Sale Quote button, which appears to offer the merchant the ability to create a quote for the customer. Refer to Generating Sales Quotes for more information.

Label |
Description |
|
1 |
Sale Quote - Click this button to generate a sales quote. Refer to Generating Sales Quotes for more information. |
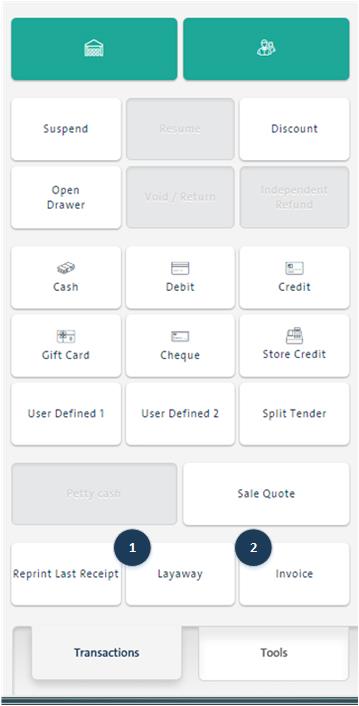
This represents the button configuration that appears when Use Layaways and Use Invoices are both set to Yes in the Configuration - Settings screen. Most of the buttons are the same as the Default configuration; the only difference being the addition of the Layaway and Invoice buttons. Refer to Putting Items on Layaway and Invoicing Sales for more information on how to use these features.

Label |
Description |
|
1 |
Layaway button - Click this button to begin the process of putting the current transaction items on layaway. See Processing Deposits/Payments and Putting Items on Layaway for more information. |
|
2 |
Invoice button - Click this button to begin the process of invoicing the current transaction. See Processing Deposits/Payments and Invoicing Sales for more information. |