Once you have found the original sale to return, and selected the products that the customer is returning/exchanging, you need to complete the return by processing payment to store credit. Store credit can be used as payment by a customer during a subsequent transaction.
NOTE: You do not need to process a refund with the same payment method that was used in the original sale. However, if the original sale was processed as a split tender payment, you have to process the refund using a single tender type.
The store credit refund process differs slightly depending on whether the original sale has a customer assigned or is anonymous.
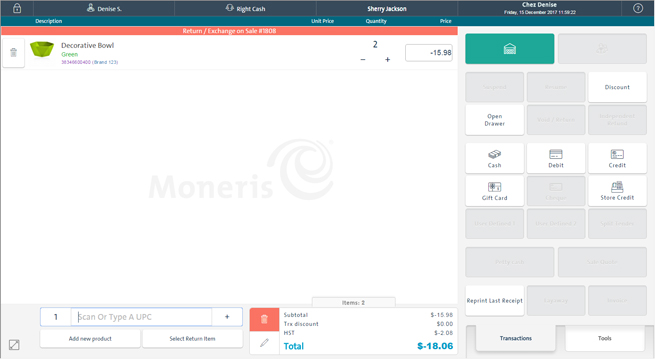
In the POS view, find the original sale you wish to return.
In the Select product(s) for return or exchange popup, select the items the customer is returning. If applicable, add items the customer is taking in exchange.
The POS view reappears and the items selected for return appear on the bill with a negative amount due.
On the Transactions buttons panel, click Store Credit.
The Store Credit Refund popup appears showing the name and phone number of the assigned customer, and the refund amount in read-only mode.
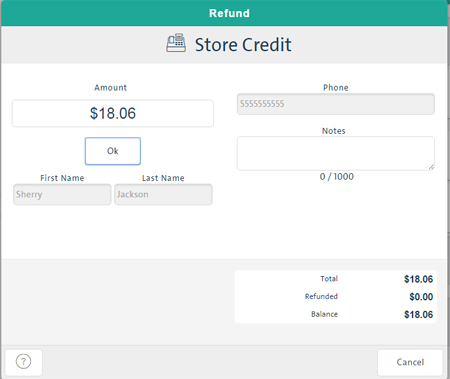
Verify the amount being refunded on the left side of the popup.
If applicable, fill in the Notes field, then click OK.
The system processes the transaction and returns to the POS view. A refund receipt prints.
The refund receipts contain the Store Credit ID that will be used for reference when the customer makes a purchase with the store credits.
NOTE: Your system may behave differently depending on how receipt options were configured.
In the POS view, find the original sale you wish to return.
In the Select product(s) for return or exchange popup, select the items the customer is returning. If applicable, add items the customer is taking in exchange.
The POS view reappears and the items selected for return appear on the bill with a negative amount due.
On the Transactions buttons panel, click Store Credit.
The Store Credit Refund popup appears.
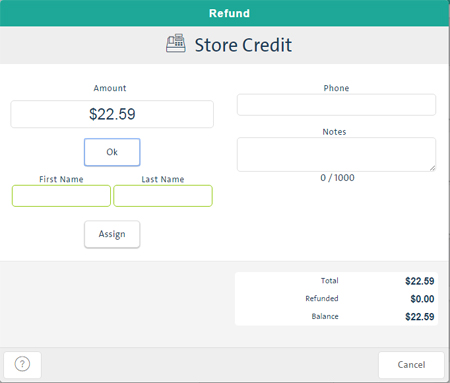
Enter the First Name and Last Name of the customer who is receiving the refund (required).
Verify the amount being refunded on the left side of the popup.
Enter a Phone number where the customer can be reached (optional).
NOTE: Customer information is stored in your system with the refund for reference when the customer makes a purchase with the store credits.
If applicable, fill in the Notes field, then click OK.
Click OK to complete the refund.
The cash drawer opens and the refund receipts print containing a Store Credit ID for reference when the customer makes a purchase with the store credits.
NOTE: Your system may behave differently depending on how receipt options were configured.
Processing a Cash or Gift Card Refund
Processing a Credit Card Refund