Use the purchase order functionality in the PAYD Pro PlusTM In-Store Solution to create purchase orders (POs) for suppliers in your supplier database. The functionality allows you to automatically create a PO for a supplier to order products in need of replenishment based on Low Stock Report information. You can also create a PO to order any products in your inventory from a supplier regardless of in-stock quantities and even if the products are not sourced by the suppliers defined in PAYD Pro Plus.
When you create a PO and are ready to process the order, you "generate" the PO by creating a PDF and directly emailing it to the supplier (if the supplier's profile contains an email address) or downloading it to mail to the supplier and/or to keep for your records. Once a PO is generated, it is assigned an Ordered status. When inventory is received, you can complete the PO and change its status to Received. Note that you can generate a PO as many times as you want regardless of its status.
NOTE: If you want to create a PO but are not quite ready to put the order through, you can save the PO as a Draft. You can return to a Draft PO at any time to update quantities and/or products, and to generate it when you are ready to put the order through.
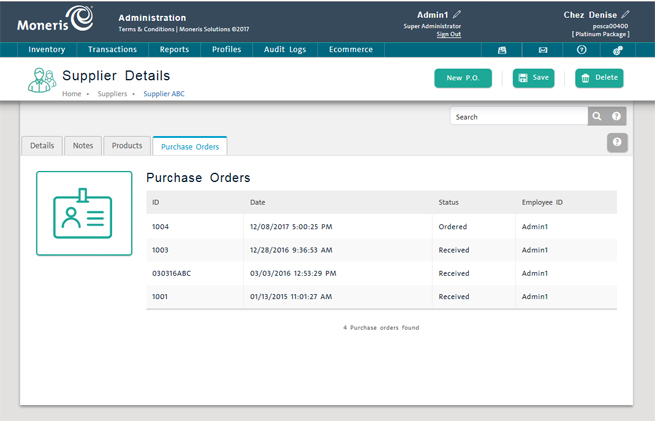
Purchase orders are created through the Purchase Orders tab on the Supplier Details screen, which is accessed through the Suppliers Search Results screen.
On the PAYD Administration main screen, click Profiles.
On the Profiles menu, under the Suppliers section, click Search.
Search for the supplier.
In the list of suppliers, click on the supplier's name from whom you want to order.
Details of the supplier appear on the Supplier Details view with the Details tab selected.
Click the Purchase Orders tab.

Click the New P.O. button at the top of the screen.
A popup appears asking you: Would you like to include all items for this supplier that are on the low stock report?
Do one of the following:
To automatically add to the PO the supplier's products in need of replenishment, click Yes. You can add or remove products at any time before generating the PO.
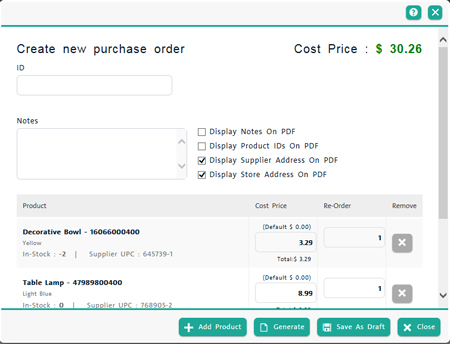
The Create a New Purchase Order popup appears. If you clicked Yes, the PO is pre-populated with the relevant products.

OR
To manually add any products in inventory to the PO, click No. Proceed to "To select and add products to the PO" below.
The Create a New Purchase Order popup appears. If you clicked No, the PO is blank.
At the bottom of the Create new purchase order popup, click the Add Product button.
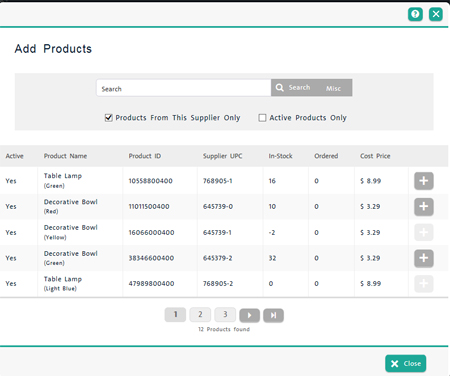
The Add Products popup appears. Any products sourced by the supplier appear in a list below. If the list is empty, search for items to add to the order.

Select and add products following these guidelines:
To search for products and display them on the product's popup list, enter Supplier UPC, Product ID or Product Name in the search textbox and click the Search button. To include only products sourced by the supplier, leave the Products from this supplier only checkbox selected. To include only active items, place a checkmark into the Active products only checkbox. To include all products, deselect the checkbox.
To add a product on the popup's product list, click its Add button (![]() ). Add buttons of products already added to the PO are greyed out.
). Add buttons of products already added to the PO are greyed out.
To add a non-inventory product to the PO, click the Misc button, enter Supplier UPC and Product Name in the Add a Non-Inventory Product popup, and click Add.
When you are finished selecting and adding products to the PO, click Close at the bottom of the popup.
You are returned to the Create a New Purchase Order popup displaying the items added to the PO.
In the product's Re-Order field, enter the quantity of the product you want to order. If the product is in inventory and its re-order quantity is specified, the field is automatically populated accordingly. Otherwise, the quantity is set to 0.
NOTE: While the PO is in the draft phase, the Cost field shows the total $ cost of the current order. The Cost field value is recalculated each time you click Save.
Click the Add Product button at the bottom of the popup and repeat the steps above.
Click its Remove button (![]() ).
).
Enter notes in the Notes text area and click the Display notes on PDF checkbox.
NOTE: The Notes appear below the order table in the PO (PDF file) that is emailed to the supplier.
Place a checkmark in the Display product IDs on PDF checkbox.
Click inside the ID field in the top right corner of the Create new purchase order popup and enter your own order ID. (alphanumeric characters only - 2 - 20 characters max)
NOTE: You can also edit the purchase order ID after the order has been saved.
At the bottom of the popup, click Save as Draft.
The PO is assigned a Draft status and can be updated any time until generated.
Save the order as a draft (see above).
Click the Draft PDF button.
A File Download dialog box opens.
Choose one of the following options:
o To open the PO as a PDF, click the Open button. The PDF opens in a separate window.
o To save the PDF file, click the Save button and select a location to save the PDF file.
o To cancel the operation, click the Cancel button. You are returned to the PO screen.
NOTE: When the PO is in draft PDF form, you are able to print it and send it to the supplier to fulfill the order. When they send the stock to your business, you are able to make changes to the PO (e.g. cost, price, quantity etc.) before receiving it.
At the bottom of the popup, click Generate.
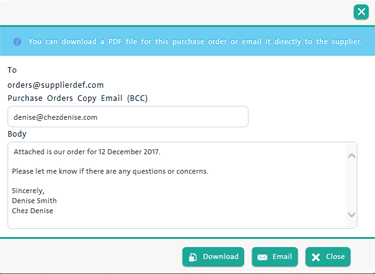
A screen appears with a draft email.

Choose one of the following options:
o Email - To send the PO directly to the supplier as an email (with the PO attached), fill out the Purchase orders copy email with the email address you want the email sent to as a copy (BCC), and the Body section. There is already draft email text in the Body section: you may leave this text as is, or edit the text to compose your own message. Click the Email button when finished. You will receive notification that the PO was sent successfully.
o Download - To save and/or print the PO's PDF, click the Download button. You are able to Open or Save the PO as a PDF, or Cancel the operation and return to the Purchase Orders tab.
o Close - To close the PO generation screen and return to the Purchase order screen, click the Close button.
When inventory is received on a PO, the PO's status is changed from Ordered to Received and the PO is completed. POs are completed in one of two ways: 1) by manually setting the PO's status to Received or 2) by receiving inventory against the PO through the Receive Inventory function.
Search for the PO's supplier. See Searching Suppliers.
On the Suppliers Search Results screen, click the Supplier Name.
On the Supplier Details screen, click the Purchase Orders tab.
On the tab's list of POs, click the PO's ID.
On the PO Details popup, select Received from the drop-down list at the top of the popup.
At the bottom of the popup, click Save.
On confirmation, click OK.
See Receiving Inventory.
A PO in PAYD Pro Plus can be viewed and generated at any time regardless of its status. POs with a Draft status can be updated by adjusting quantities and adding/removing products.
Search for the PO's supplier. See Searching Suppliers.
On the Suppliers Search Results screen, click the Supplier Name.
On the Supplier Details screen, click the Purchase Orders tab.
On the tab's list of POs, click the PO's ID to display it in the Purchase Order Details popup.
At the bottom of the Purchase Order Details popup, click Generate and follow the steps under Creating a Purchase Order above.
NOTE: Generating a PO with a Draft status changes the status to Ordered.
Click inside the ID field in the top right corner of the Purchase order popup and enter your own order ID. (alphanumeric characters only - 2 - 20 characters max).
On the Purchase Order Details popup, add/remove products and change re-order quantities as needed following the steps under Creating a Purchase Order above.
To save changes, click Save at the bottom of the popup.
At the bottom of the Purchase Order Details popup, click Delete.
On the PO Details popup, select Cancelled from the drop-down list at the top of the popup.
At the bottom of the popup, click Save.