Click inside the HTML text editor in the Content section.
Select the text you wish to convert to a link, and click the Hyperlink button (![]() ).
).
Click Insert Link.
It is possible to add three types of hyperlink to an article created in the PAYD Pro Plus ecommerce module: a URL, an email address or an anchor.
NOTE: You must create the article first. During the drafting, you can add hyperlinks to the articles, or you can add the hyperlinks once the text has been drafted. For more information on:
● creating the article, refer to Creating Ecommerce Website Articles
● using the HTML text editor to draft an article, refer to Using the HTML Text Editor.
The Text/Images Hyperlinks Widget can link to the hyperlinks that you add to articles in this screen.
This topic explains how to:
● link to a URL within an article
● link to an email address within an article
● insert an anchor into an article.
A URL is also referred to as a 'web address'. It is possible to insert a hyperlink within an article to an external URL of another site somewhere on the web. You can choose various options when linking to a URL, including what text it will display and if the link will launch in a separate browser window, or in a separate tab of the same browser as the eCommerce website.
For example, if you are writing an article about toy trucks that you sell, you can insert a URL hyperlink into the article that links specifically to a product's page on the manufacturer's website. There are an unlimited number of URLs that you can link to within an article.
Open up a separate web browser window, and navigate to the URL to which you will link.
NOTE: Make sure the URL is spelled correctly and that the page loads properly.
Select and copy the link (right-click and choose Copy, or hold down the Ctrl key on the keyboard and press the letter 'C').
From the PAYD Administration main screen, click Ecommerce.
On the Ecommerce menu, under the Site section, click Themes.
The Themes screen appears.
Click on the theme you wish to edit.
The theme's profile appears.
Click the Articles tab.
The list of articles appears.
Click the article in the list that you wish to edit.
The article's profile appears.
Click inside the HTML text editor in the Content section.
Select the text you wish to convert to a link, and click the Hyperlink button (![]() ).
).
Click Insert Link.
The Link popup appears. In the Link popup, the Text field is already populated by default with the text you highlighted in the article.
In the Link popup window, paste the copied URL (from step 2) into the URL field. (Click inside the field, right-click and choose Paste or hold down the Ctrl key on the keyboard and press the letter 'V').
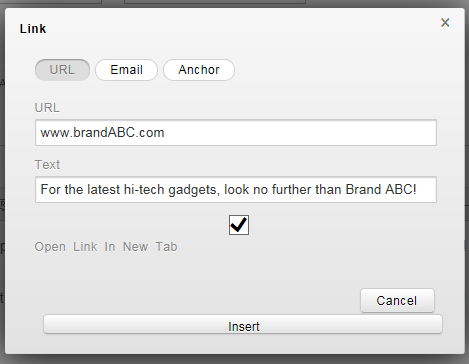
If desired, change the displayed text by clicking inside the Text field and typing in whatever you want the link to display to the article's audience.
EXAMPLE: If you have highlighted text in step 9 that says 'here', but you want it to display 'here to go to the manufacturer's website', enter this text string into the Text field.
NOTE: If you wish to leave the text the same as the selected text from step 9, leave the Text field alone.
Do one of the following:
● If you want the URL to launch in a separate web browser when clicked, leave the Open link in new tab box unchecked.
OR
● If you want the URL to launch in a separate tab in the same browser when clicked, place a checkmark in the Open link in new tab checkbox.
Click the Insert button at the bottom of the Link popup.
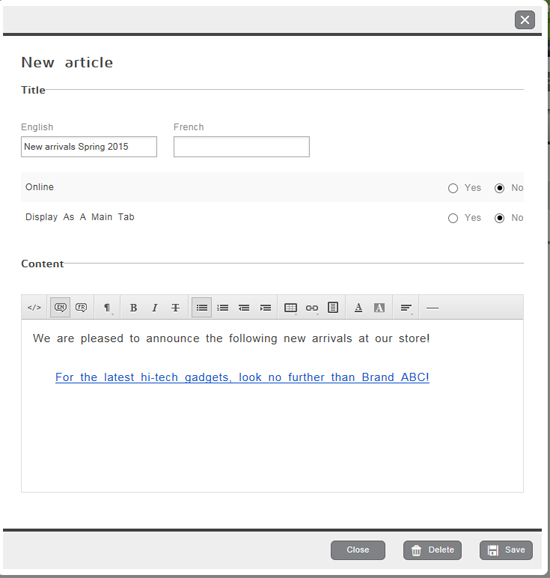
The HTML text editor screen appears. The linked words appear as blue and underlined.
Click the Save button at the bottom of the New Article popup.
Repeat steps 1 - 15 as necessary to insert other links to URLs within an article.
● Select the link text within the HTML text editor window and delete it.
OR
● Select the link text, click the Hyperlink button (![]() ) and click Unlink.
) and click Unlink.
● Return to the Themes screen and click the Preview button.
● See Previewing a Theme for more information.
It is possible to link to an email address within an article. When clicked, the link will launch the website user's default email program. The clicked address will be entered into the To field (the recipient) in the email composer. The website user can compose an email and send to the recipient.
NOTE: The email hyperlink will launch the computer's default email program on the reader's computer. The email hyperlink cannot launch a webmail account.
From the PAYD Administration main screen, click Ecommerce.
On the Ecommerce menu, under the Site section, click Themes.
The Themes screen appears.
Click on the theme you wish to edit.
The theme's profile appears.
Click the Articles tab.
The list of articles appears.
Click the article in the list that you wish to edit.
The article's profile appears.
Click inside the HTML text editor in the Content section.
Select the text (or email address) you wish to convert to a link, and click the Hyperlink button (![]() ).
).
Click Insert Link.
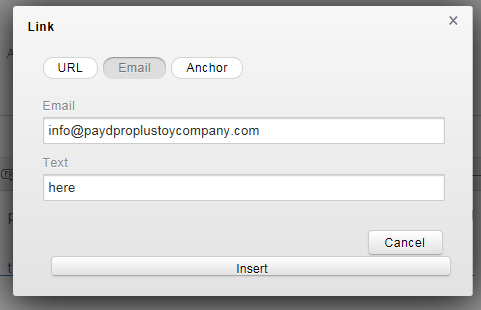
The Link popup appears. In the Link popup, the Text field is already populated by default with the text (email address) you highlighted in the article.
In the Link popup, click the Email button at the top of the screen.
Click inside the Email field and enter the email address to which you are linking.
NOTE: Please ensure the address is spelled correctly, so that customers' email messages do not produce 'undelivered' errors.
In the Text field, enter the text you wish the address to display.
EXAMPLE: If you have highlighted text in step 9 that says 'here', but you want it to display '[email protected]', enter this text string into the Text field.
NOTE: If you wish to leave the text the same as the selected text from step 7, leave the Text field alone.
Click the Insert button at the bottom of the Link popup.
The HTML text editor screen appears. The linked words (or email address) appear as blue and underlined.
Click the Save button at the bottom of the New article popup.
Repeat steps 1 - 13 as necessary to insert other links to email addresses within an article.
● Select the link text within the HTML text editor window and delete it.
OR
● Select the link text, click the Hyperlink button (![]() ) and click Unlink.
) and click Unlink.
● Return to the Themes screen and click the Preview button.
● See Previewing a Theme for more information.
Anchor links enable you to mark a specific area of the article (e.g. a heading, paragraph or even a word) with an 'anchor'. Once the anchor is placed in the article, you can link to it from another page (or from within the same article). When the link is clicked, it jumps directly to the 'anchored' section of the article.
For example, if you have a page of FAQs, you could place an anchor at the top of the FAQ page. At the end of each question and answer, you can place a "Back to Top" link that returns the user to the top of the page when clicked.
From the PAYD Administration main screen, click Ecommerce.
On the Ecommerce menu, under the Site section, click Themes.
The Themes screen appears.
Click on the theme you wish to edit.
The theme's profile appears.
Click the Articles tab.
The list of articles appears.
Click the article in the list that you wish to edit.
The article's profile appears.
Click inside the HTML text editor in the Content section.
Select the text you wish to anchor to, and click the Hyperlink button (![]() ).
).
Click Insert Link.
The Link popup appears. In the Link popup, the Text field is already populated by default with the text you highlighted in the article.
Click the Anchor button at the top of the Link popup.
Adding Images to Ecommerce Articles
Creating a Text/Image Hyperlink Widget