View employee summary information and employee details in the Employees screen.
On the PAYD Administration main screen, click Profiles.
On the Profiles menu, under the Employees section, click Search.
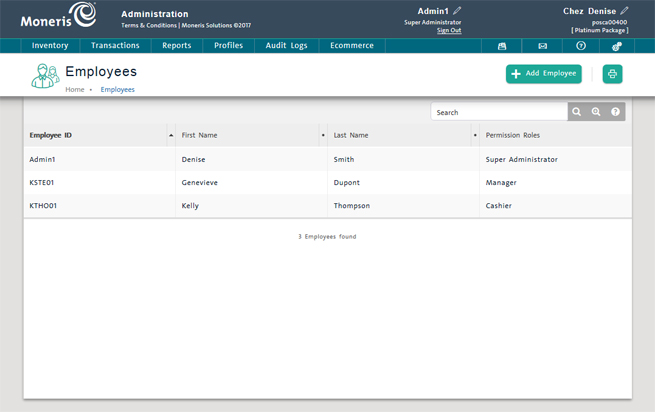
The screen displays a list of employees in the system.
TIP: To go directly to your own employee profile, on the application header, click your Employee ID.
The employee list displays the following information for each employee profile. The list is sorted in ascending order by Employee ID.
Employee ID - The ID used by the employee to log in to the PAYD Pro PlusTM .
First Name - The employee's first name.
Last Name - The employee's last name.
Permission Roles - The permission rolePAYD Pro Plus
Find the employee profile by:
Browsing the employee list.
OR
Using search (see Searching Employee Profiles).
On the employee list, click the Employee ID.
The Details screen displays the employee profile with the General Info tab selected.
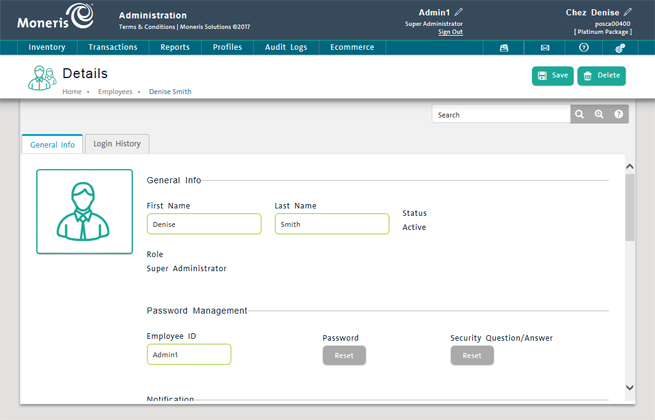
Employee information is displayed in two tabs: General Information and Login History. If you are viewing the employee profile from Multi Location Administration , you can see a Stores tab.
Click the General Info tab (the default tab):
In the General Info section, view the following:
First name - The employee's first name.
Last name - The employee's last name.
Status - The employee's status. Inactive employees are not able to log in to PAYD Pro Plus.
Role - The to which the employee is assigned. An employee's role determines his/her ability to perform PAYD Pro Plus In-Store POS view and PAYD Administration functions.
Multi Location Role - The Multi Location to which the employee is assigned. This field only appears when you view an employee from Multi Location Administration. An employee's Multi Location role determines his/her ability to perform Multi Location Administration functions.
In the Password Management section, view the following:
Employee ID - The ID the employee enters to log in to PAYD Pro Plus.
NOTE: You can also reset an employee's password and their security phrase and answer. See Editing an Employee Profile for more information.
In the Notification section, view the following:
Email - The employee's email address.
Moneris Notification List - Check the box to indicate whether the employee is on the Moneris Solutions notification email list (e.g. low stock notifications).
Phone - The employee's primary phone number (and extension, if applicable).
Mobile - The employee's mobile phone number (and extension, if applicable).
In the Address section, view the following:
Address & Address 2 - The employee's street address.
City - The employee's city of residence.
Country - The employee's country of residence.
Province/State - The employee's province or state of residence.
Postal/ZIP code - The employee's postal or zip code of residence.
In the Limits section, view the following:
Refund limit - The maximum amount the employee is able to refund without an override.
Discount limit - The maximum amount the employee is able to discount without an override. Leave the field blank for no limit.
Commission - The percentage (%) of each sale an employee receives as a commission. Entering a value enables sales commissions for the employee.
NOTE: When PAYD Pro Plus is configured to use commissions, all Inventory products are subject to a commission unless removed for specific products (see Entering Additional Product Information).
Click the Login History tab:
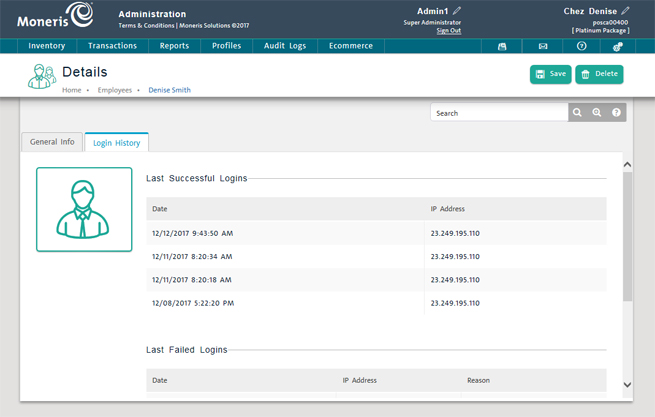
Last Successful Logins - The employee's last four (4) successful logins, showing the date and time of the login, and the IP address from which the user logged in.
Last Failed Logins - The employee's last four (4) failed logins, showing the date and time of the login, the IP address from which the user logged in and the reason for the login failure (e.g., Wrong password).
NOTE: If the employee is new and has not yet logged in to the system, the tab will contain the following message: No login history yet.
The Stores tab shows the stores in your enterprise that the employee can access according to his or her permission roles.
Click the Stores tab:
