A Product widget is a way to display your products. It can be accomplished in two steps:
From the PAYD Administration main screen, click Ecommerce.
On the Ecommerce menu, under the Site section, click Themes.
In the Ecommerce - Themes, click on the theme name.
The theme's profile screen appears.
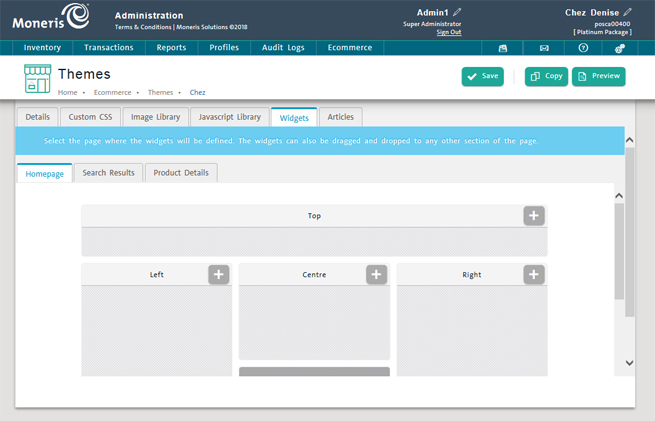
Click the Widgets tab on the top of the screen.

Select the tab which represents to page on which you want your widget to appear. Choose from:
● Homepage - This is the default tab selected. Homepage represents your ecommerce website's home page. This is the page that customers will see first when they arrive at your website.
● Search Results - This tab represents a Search Results page that will appear once a customer has used search functionality on the ecommerce website to search for something.
● Product Details - This tab represents a product details page that is unique to each product clicked on from the homepage or from search results. When a customer clicks on a product, the product details page loads up.
Once you have selected the tab, use the mock-up of the web page to select the area of the web page on which you want the widget to appear. Choose from:
● Top
● Left
● Centre
● Right
● Bottom
● Footer
● Absolute Positioning.
In the area of the page where you wish to add the widget, click the ![]() button.
button.
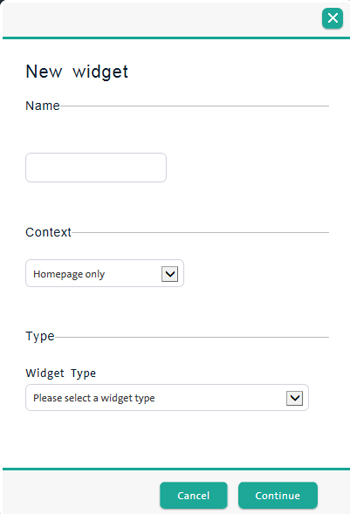
The New widget screen will appear.

In the Name field, enter a name for the widget.
Click the Context drop-down menu and select the context in which you would like the widget to appear following these guidelines:
● All contexts - The widget will appear on every page of your ecommerce website in the area you selected in steps 6 and 7.
● Homepage only - The widget will only appear on the homepage of your ecommerce website in the area you selected in steps 6 and 7.
● Search Results only - The widget will only appear on the Search Results page of your ecommerce website in the area you selected in steps 6 and 7.
● Product Details only - The widget will only appear on the product details page of an item that the user clicked in the area you selected in steps 6 and 7.
Click the Widget Type drop-down menu and select Products.
Click the Continue button.
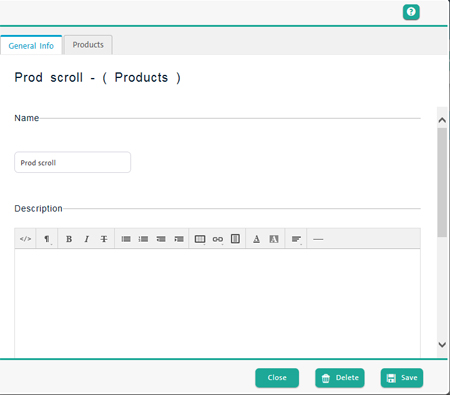
A profile screen appears that enables you to define the widget's behaviour and determine what products will be included. The Name field will already be populated by whatever you entered in step 8.

Enter a widget description in the Description field. A French Description is optional. See Using the HTML Text Editor for more information.
Complete the fields in the Details section as follows:
● Optional div ID - the div ID is an alphanumeric identifier for the widget. This identifier is used by CSS to refer to the widget. The value entered here should be unique (e.g. do not use this div ID for multiple widgets).
● Online - use these radio buttons to select whether or not the widget will be visible on your ecommerce website. Select Yes to make the product widget visible; select No to remove it from your site.
● Context - use this drop-down menu to select which pages of the ecommerce website will display the product widget. Select All to have it appear on all ecommerce pages; select Homepage to have it appear only on the homepage; select Search Results to have it appear only on the results of a product search or select Product Details to have it appear only on a product's details page.
NOTE: The Context options are mutually exclusive - you cannot choose to have a Widget appear in Homepage and Search Results. It can only appear in one place or all places.
● Display location - use this drop-down menu to select the location on the page where the product widget will appear. Think of the ecommerce page being divided into five areas; three vertical columns dividing the page into left, right and centre, and two horizontal columns dividing the page top and bottom (sitting above and below the vertical left, centre and right columns). Select Top to have the widget appear along the top of the page; select Left to have it appear along the left column, select Centre to have it appear in the centre column, select Right to have it appear in the right column, select Bottom to have it appear along the bottom of the page, select Footer to have the widget appear in the page footer (the very bottom of the page), or select Absolute positioning to be able to specify a position for the widget in the CSS file.
NOTE: When using the Absolute Positioning option, please be aware that this works in tandem with the Optional div ID entered above, therefore the div ID is required to use this display location. In the CSS file, you can refer to the widget by its div ID and specify a coordinate on the page to place the widget (e.g. 300 pixels from the top, 200 pixels from the right).
● Number of Products Displayed - enter a numeric value in this field to determine how many products will be displayed within the widget. For example, entering '20' into this field means 20 products will be displayed. This number must be greater than 1.
● Number Per Row - enter a numeric value in this field to determine how many products will be displayed in a row. This number must be between 1 and 9.
Proceed to add products to your widget.
In the product widget's profile, click the Products tab.
Click inside the search field and type in the product's name or product ID.
OR
Click the Search icon (![]() ) and browse the product list.
) and browse the product list.
OR
Hover your mouse cursor over the Category drop-down, then click the category you wish to add. A list of items belonging to the category is displayed.
Once you have located the item, click the ![]() button beside the product.
button beside the product.
Repeat steps 2 and 3 to continue populating the widget with products.
Click the Save button on the bottom of the popup when finished.
● Place a checkmark in the Available Online Only checkbox. This will exclude products from your list that are not flagged to be sold online.
● Click the ![]() button beside the product name to remove it.
button beside the product name to remove it.
● Click the Ok button to confirm the deletion.
WARNING: Do not click the Delete button on the bottom of the widget profile - this will delete the widget, not remove the product.
● Refer to the Deleting Widgets topic for more information.
Creating a Shop by Brand Widget
Creating a Shop by Category Widget
Creating an Image Slide Show Widget